Articles

This is the section where we will keep all of our articles and educational posts so you don’t have to scroll down the front page to find them!
For several years, Mike wrote the “How to” photography articles for Scuba Diver Australasia magazine which is published in Singapore and widely distributed throughout the Asia-Pacific area. As part of our blog, we have decided to post these articles here so folks who didn’t see them in print get a chance to read them.
The Near and Far
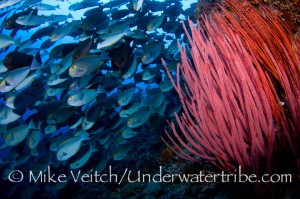
 As the name might suggest, close focus wide angle (CFWA for short) is the term used for a style of photograph involving a very wide angle lens and getting as close to a subject as possible. One might wonder “why not use a macro lens if you are trying to get close to the subject?” The CFWA is a different animal than macro photography with different goals and subject matter in mind.
CFWA subjects are a far cry from the shrimps, nudibranches, and other small critters popular amongst macro photographers. The typical CFWA subject is a readily approachable medium sized object such as an anemone, soft coral, or certain species of fish such as lionfish or crocodilefish. It may sound like some of these subjects are too small for a wide angle lens or that these lenses are better suited to large landscape shots or creatures such as mantas or whales, not true! The great thing about most wide angle lenses is the fact they are capable of focusing mere centimeters away from the end of the port. What does this mean to the underwater shooter? Simple, you can fill half the frame with your main subject and have plenty of room to enhance the “negative” space with another subject to maximize the impact of the photo.
Here are a few tips to get you on the way to mastering Close Focus Wide Angle photography.
The foreground is key
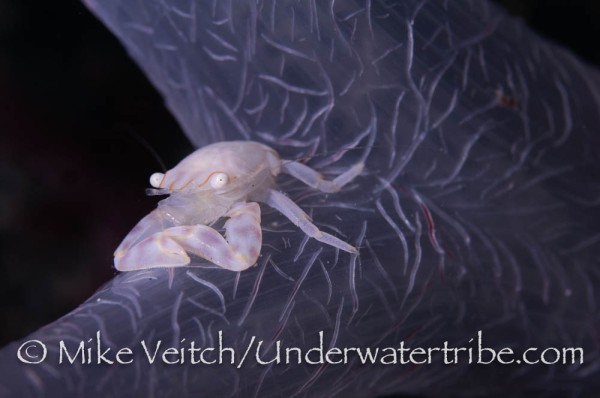
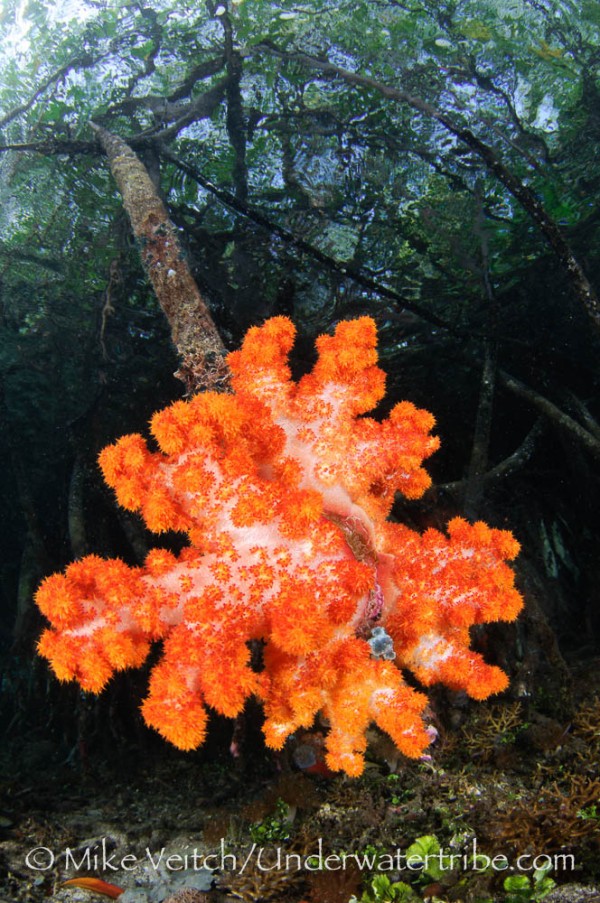
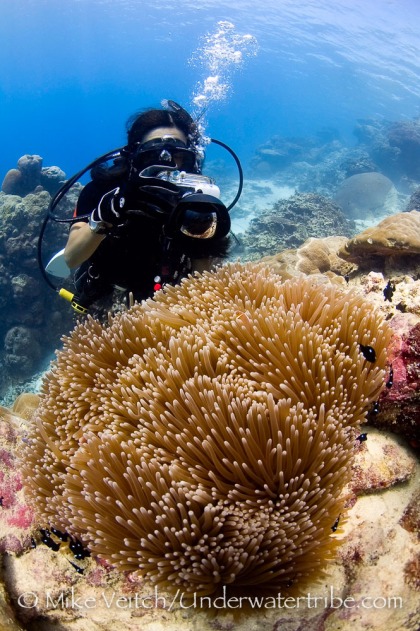
 What really makes a CFWA photograph stand out is an engaging, bright, and colourful main subject. The first order of business is finding a strong subject to fill this role. We all know that sharks and mantas don’t offer close photo opportunities on every dive so the best way to start producing CFWA photos is to choose static objects to practice on in order to perfect strobe positioning and exposure. One of my favourite subjects are anemones with their myriad of colours and personable resident clownfish. The size of anemones is perfect for CFWA and when they are balled up in feeding position they make for a brilliant foreground. Other subjects that lend themselves well to CFWA photos include soft corals, sea fans, and hard corals.
Get close, now get closer
 What surprises many new shooters is exactly how close you need to get to a subject to fill the frame. With a rectilinear lens such as a Nikon 12-24mm (and dioptre) or the classic Nikonos 15mm, it’s possible to get 15cm from the lens. With the ever more popular fisheye lenses, the focus is so close that you have to be careful not to bump your subject with the dome port! Getting this close to subjects means they fill the frame enough to be THE main subject and do not suffer from distracting bits of coral around the edges.
 Flip it
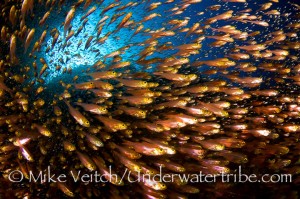
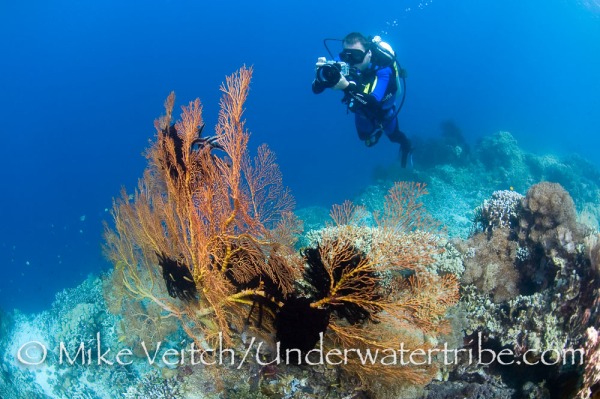
One of the benefits to CFWA shots is the opportunity to add a secondary subject to the photo, or the “near and far” approach. Due to the wide angle of the lens, the main subject often doesn’t fill the entire frame and leaves empty space around it that benefits from creative composition. This is the photos’ “negative space” and what you do with it can be the difference between a good photo and a great photo. In CFWA shots, the easiest way to gain “negative space” is to flip your camera and shoot the photo from the vertical position. When shooting vertically, there is a whole lot of blue to work with. The blue background in and of itself is a nice complement to a colourful subject but it also lends itself very well to additional elements. Two of the easiest elements to add to the background are sun rays or a diver silhouette. It’s simply a task of getting in the right position to add the sun to the frame and a few hand signals with your buddy to get him/her in the right position. Obviously there are other subjects that can be added to the background of a photo but most take a good deal of luck by being in the right place at the right time. One thing I keep in mind when I am diving in areas where “Mr Big” can be found is: “what would make an interesting foreground?” By knowing where a large piece of soft coral or sea fan is located, I can be in position to include it in the foreground of my photo when that manta or shark swims by. Although a shark on its own might be too small to fill the frame, I now have a two part photograph with a near and far subject. This photograph is visually more appealing than either subject would be on its own.
 Get the Lights
One of the most overlooked aspects of close focus photos is strobe positioning. In traditional wide angle photography, we set our strobe arms out wide to “edge light” the subject while avoiding backscatter. If you were to move in close and take a photo without adjusting the strobes you may be surprised just how dark that photo turns out! In close focus photography, having the arms out wide doesn’t work. With the dome scant inches from the subject, the light from the strobes would miss the subject entirely. One way of lighting the subject would be to leave the strobes wide and turn them to face the subject. However, this approach can lead to unsightly shadows cast upon the face of your critter. A superior way of lighting a close subject is to bring the strobes right in to the dome port and pointing them slightly outside of parallel to the lens. Not only does this avoid shadows, it also cuts down on backscatter around the edge of the frame. If using a fisheye lens, be careful when using this technique, it’s important to bring the strobes behind the plane of the camera in order to avoid strobe flare. Another piece of advice when using the fisheye lens: use a small dome port as opposed to using a “super dome”, the wide radius of these domes prove tricky when trying to aim the strobes at a subject centimeters away.
 Metering
When metering for the background exposure there is one thing to keep in mind: meter the background, not the subject. First, compose your photo and set your f-stop based on the distance you will be from the subject. Next, back away a touch and aim the camera at the background in order to set the shutter speed correctly. “Backing away” is important due to the amount of light the main subject cuts off from the lens. This blocking will create a false reading in the camera and either under or over expose the background. A clear and unobstructed view of the blue water is the best way to achieve the right exposure.
 Ever wanted to get one of your photos on the cover of a dive magazine? If you look carefully at the cover of a dive magazine, the vast majority of wide angle covers feature close focus shots and they are all shot vertically! One thing a cover photo needs is a lot of space at the top of the shot and the wide view of a CFWA photo provides this perfectly. By positioning the subject in the middle to bottom third of the photo there is plenty of negative space at the top and bottom of the frame to add either a secondary far subject, or if luck is on your side, the title of a magazine!
Mike Veitch
8 Ways to Improve Your Photography on a Single Dive
It’s a brand new year and I am sure there were lots of underwater goodies in the stockings of avid divers during Christmas. For those who received a new camera, it may seem like the “latest and greatest” camera should be able to take stunning pictures straight out of the box. However, sadly that is just not the way it works with underwater photography; don’t be dismayed however! Here are 8 tips to consider on your first dive with that great new piece of technology.
Get closer

Getting Close to a Wobbegong
This is the single most important piece of advice for any new underwater photographer. Although it’s tempting to use the ever present zoom control on your compact camera, it’s always best to use your fins to “fill the frame” as opposed to the zoom dial. Getting physically close to the subject adds a host of positives to your photography. Foremost, it means there will be less water between your camera and the subject; this means less backscatter and richer colours in your photos. It also means you can utilize a higher numbered f-stop in order to maximize how much of your photo is in focus. Remember, the higher the number, the better the depth of field. However, don’t just ignore that zoom dial, it does have an important role in photography. When you have gotten as physically close as you can to your subject, but the composition still doesn’t work right, utilize the zoom dial to isolate your subject and fill the frame before you shoot.
Use Add On Lenses
Add on macro diopters really improve macro
If Santa was kind, you may have also received some “add on” accessories with your housing. This could be a macro lens, a wide angle lens or even better: an external strobe. By utilizing all the tools at your disposal, your chances of a stunning photo increase exponentially. One of the drawbacks of a compact camera is a relatively narrow field of view when it comes to pure wide angle photography. In order to light up an entire sea fan, soft coral or charismatic megafauna, a wide angle lens is a must. By allowing you to fill the frame with your subject from a closer distance, it allows all of the benefits discussed above. To really make the colours of a soft coral “pop” you need to have your camera as close as possible to the subject. A wide angle “add on” allows this but at the same time does not restrict you to only big subjects on a single dive. The beauty of the compact housings is the ability to change these “add on” lenses underwater.
For the critter lovers there are also “macro” lenses available. Although many compacts come equipped with a macro preset, it is very limited in its usefulness underwater. Some brands of camera will not allow zoom while in the macro mode and others even restrict the use of flash. In order to fill the frame with your subject you need to be mere centimetres away from it! Obviously this does not work well when it comes to shy fish or invertebrates as they won’t often allow a diver to get that close. By adding a supplemental macro lens you can enjoy the benefits of zooming in tight on small subjects without having to get so close that it runs away. There is even the ability to stack macro lenses on top of one another for that extra tiny pygmy seahorse.
Use an External Strobe

Internal Flash

External Strobe
The greatest “add on” you can add to your system is the external strobe. One of the drawbacks of the compact camera is the shadow that it casts over the subject from the lens mount. The only cure to this bit of frustration is adding an external strobe and arm set to your system. By getting the strobe up and away from the lens, you will eliminate shadowing right away. Another major benefit of an external strobe is the ability to minimize image ruining backscatter. An external strobe allows you to utilize “edge lighting” and not illuminate particulate directly in front of the camera. A third major advantage of an external strobe is the power output available. By having a wider and stronger flash, larger objects can be lit properly to bring out rich and pleasing colours.
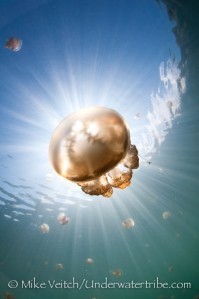
Shoot Up

Shoot Up!
This may sound simple, but by getting low and shooting up, your photos gain a whole new dimension and contrast. One of the most common mistakes a beginner makes is to hover above their subject and shoot directly down on it. This results in the recognizable anemone and clownfish combination looking not like a bright and beautiful bit of nature but rather more like a bowl of spaghetti and orange meatballs. By getting down to the anemone’s level and shooting straight or a little upward, the fish will look like a fish and the anemone can look like a “technicolour dreamcoat”. In wide angle photography, the advantage of shooting up is instantly obvious. By aiming toward the surface, you achieve rich, colourful foregrounds contrasted against deep blue backgrounds.
Shoot Vertical
Shoot Vertical
Shooting vertically is another simple trick with major rewards. Although it may seem a little unnatural at first, a quick turn of the camera will bring out the natural lines of subjects that a horizontal viewpoint can’t display. Think facial portraits, nudibranches, or eels; all of these subjects are well represented by a vertical composition. Another thing to remember is the rule of thirds; align the eyes or main part of the subject along the top or bottom third of the frame in order to create depth and balance in the photo.
Stop, Watch, Shoot

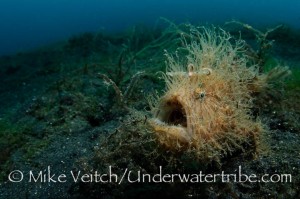
Wait for the behaviour, the mouth opening to reveal the parasite
The most memorable photographs are ones that capture the behaviour of the subject. The underwater world hosts a plethora of animals that perform a variety of interesting activities night and day. Eating, fighting, mating, and cleaning actions are a small sample of different actions that marine life exhibit. However, it’s not an easy task to capture these behaviours on camera. Simply seeing a shrimp cleaning the mouth of a grouper does not mean you can get a photo. If you rush in as quick as possible to capture the moment, you will be shooting yourself in the foot. In order to shoot behaviour sequences properly it takes patience and a bit of stealth. The smart way to approach these events is to “stop, watch, and shoot”. By stopping to watch the action from a respectable distance, you give the animals time to become aware and comfortable with your presence. You can then slowly close the distance until the subjects are within the focal distance and fire away.
Critical Review and the Histogram
By far the greatest advance of photography in the digital age is the instant feedback found on your monitor. Unfortunately, not enough folks use this tool to their advantage during a dive. The monitor can be used to check the focus, the lighting, and for any distractions throughout the frame such as a wayward diver in the background. In order to utilize this properly you must look at the entire frame, not just the main subject. It’s often the negative space (everything but the main subject) that makes or breaks the photo. Take the time to step back from the subject and look intently at your photo, don’t just take a series of shots and move on to the next subject. By critically reviewing the photo while still in front of the subject, you can make fine adjustments and take the photo again. The “histogram” is the best way to double check exposure, especially in very bright conditions. By understanding how to read the histogram you can adjust settings appropriately in order to achieve the best exposure. There is plenty of information about reading histograms freely available on the internet.
Know Your Camera!
One downfall of many new photographers is their eagerness to jump straight into the water without learning all the capabilites of their camera. In order to capitalize on capturing wildlife, you need to know how to change settings such as shutter speed, f-stops, EV compensation, and the macro button as quickly as possible. As the situation changes underwater, you don’t have time to fiddle too long trying to figure out where a particular button is. By practicing on land and reading the instruction manual, you will gain a great advantage underwater as it becomes second nature to change settings on the fly.
Although it may sound like a lot, these 8 steps are quick and easy to implement once you have a plan in place. If Santa was nice, he may have included a strobe and macro lens along with your camera and housing. This will get you on the way to great photos as soon as you hit the water. But if that’s not the case, don’t let the lack of these items hold you back, implement the other ideas above and you are well on your way to improving your photography on a single dive.
Reef Respect

Bombing is just one threat to coral
When I first started diving for a living the number of divers with a camera in their hand were relatively few and far between. Serious divers would carry a Nikonos V or video camera while those who were after a bit of fun would often have a Sea and Sea MX10 at their disposal. However, with the recent explosion of digital photography, it seems everyone now has a camera of some description; from small compacts to multi strobed housed SLR monstrosities. This is great in some respects, as the art of underwater photography has really blossomed and these images are being shown in more and more mainstream media helping to raise awareness of our fragile eco-system. However, as popular as photography has become it’s having an inverse affect on what we love; the reefs of the world. As we should practice what we preach, here are some guidelines the conscientious photographer should follow in order to protect the underwater environment.
Placement
As photographers, we spend a lot of time with a subject looking for the perfect angle and trying to capture the essence of that animal. Whereas the average diver often gives only a cursory glance and moves onto the next subject. As we spend an inordinate amount of time in one place, we have to be more aware of our positioning and surroundings than everyone else. Unfortunately, many careless photographers don’t care about their surroundings and zero in entirely on their subject. Not only does this give photographers a bad name, but it destroys the reef and reef life around them. Fortunately, there is a simple solution to this: look around before you settle in for a photograph. Be sure that your fins will not be resting in an anemone or sponge, keep some air in your BCD in order to keep your torso off the ground, have your “danglies” clipped onto you, and use a finger to keep yourself steady. It is far easier to keep your balance if you use your left hand as a steadying tool rather than on the camera. By looking around before you settle in for a photo, it’s easy to find a bare patch or rock in which to support yourself. Don’t just stick your hand out to grab the closest object if you find yourself losing buoyancy! Not only could you damage a delicate coral, you may stick yourself on a poisonous creature. And of course nothing ruins a photo more than the off balance diver who tries to skull their hands to keep off the bottom, this results in stirring up backscatter particles in front of the lens. When you are finished photographing your subject, take a breath and allow yourself to float away from the bottom before you start kicking your fins. Trying to kick off the bottom will result in a major dust cloud and broken bits of coral flying everywhere.
As this diver shows, there is no need to lay on the reef to get close
Current
In wide angle photography there is another dilemma that comes into play: current.
It’s not easy to keep yourself in place taking a photo if you have current pushing you along. If you find a subject along a current swept wall there’s an easy way to stop yourself and get that photo. Simply turn around and face into the current and steady yourself with a one or two finger grip on a bare patch on the wall. By doing so, you won’t have to fin a lot and therefore not kick any fragile sea-fans or soft corals. Once you are finished, push yourself away from the wall with that hand, don’t kick with your fins in an attempt to turn around! This will only result in damaging the marine life around you.
Photographer staying off the reef
Getting Sticky With It
Cameras aren’t the only recent development that have gained in popularity the last few years; “pokey sticks” a type of stainless steel rod, are now just as commonly seen as cameras. When used appropriately, these are a great asset to photographers and non photographers alike, as they allow the user to hold themselves away from the bottom with one hand instead of grasping onto coral and other fragile organisms. But, used in the wrong hands, these instruments can be a weapon of destruction. Many talented dive guides are able to use these tools in a professional manner by ruffling the dirt in front of a mantis shrimp hole or tapping on a rock to get the attention of an octopus. There is no problem with this, as long as it’s done in a gentle manner. However, many regular divers and photographers have now taken it upon themselves to use their “sticks” to try to manipulate the critters on the reef. Oftentimes, it’s not done in a gentle way and photographers are the guiltiest species of all as they try to pry a mimic octopus out of its hole for a once in a lifetime shot. Photographers are also guilty of tempting dive guides to do this in exchange for a healthy tip. Unfortunately, this scenario is playing out more and more often in popular diving spots and its effect can be seen by dwindling numbers of creatures on dive sites. As responsible photographers we can have a great influence over the behaviour of others, by showing an example and not doing it ourselves and encouraging over zealous dive guides not to do it for our benefit as it’s not acceptable behaviour.
Patience!
Don’t rush in to take photos or prod a mantis shrimp with a stick, as your intended subject will only retreat back into its hole. Instead of trying to force subjects into certain behaviour, it’s far better to display patience with marine life and allow them to act naturally. By watching your subject from a comfortable distance, you can gauge their natural patterns and behaviour. It will also give them a chance to get used to your presence and gradually allow you to get closer. You can then move forward and hopefully get that winning shot. In this vain, also remember that you can’t disturb or potentially harm animals in an attempt to add the perfect photo to your portfolio. Deliberately bending seafans to get a better angle of a pygmy seahorse or pulling the arms off of a crinoid to shoot a shrimp are completely unacceptable behaviour for everyone.

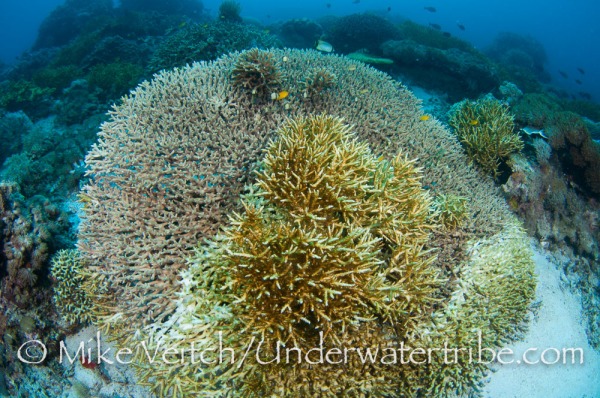
Beautiful Hard Corals
Courtesy is Everything
It’s not only the marine life that should be treated with courtesy but your fellow divers and photographers as well. As most dive resorts practice “group diving”, odds are you will be diving with other photographers and divers when you are underwater. In order for everyone to have a successful dive, it’s common courtesy to take a few photos of a subject and then move along so others also get a chance. If it’s a subject that you have a particular desire to spend a lot of time with, wait until everyone else has taken their photos and then come back to shoot it again. Also, be careful when you leave a subject you have been shooting. Be sure that you don’t disturb it when you leave in order to give your fellow divers a chance to shoot it as well.
Flashy Behaviour

Too many flashes can damage small fish life
Do you hate it when someone comes up to you and takes your photo with a bright flash? This is the same feeling that fish and crustaceans feel when photographers barrage them with light. The sensitivity of the optical nerve of organisms that live underwater is far greater than humans due to living in a dim environment. Therefore, the effect of bright strobes is felt much more so by the oceans’ inhabitants. In order to lessen your impact upon marine life it’s wise to limit the amount of photos you take of any particular subject. Not only will you be taking photos of that cute little pygmy seahorse, everyone else on the dive will too! By being patient and waiting for your subject to get in position before firing off a shot, you will have far less impact on it than those who “machine gun” image after image in order to capture one perfect shot. The sea life will thank you for it.
At the end of the day, we all love photography and can’t wait to get back in the water after our latest trip has ended. Unfortunately some of us have returned to places we have been in the past only to find the inhabitants we interacted with are no longer there! Although this may be caused by natural events such as storm damage or coral bleaching, there is no denying that popular dive locations suffer from a large amount of diver damage as well. By practicing considerate and safe photography you can lessen your impact and footprint on the coral reef. If everyone does their part, by following the guidelines above, we will all benefit in the long run with a healthy and happy underwater world.
Damaged Hard Coral
Republished Article 29 November 2012, from Scuba Diver Australasia magazine
The first post is below, it was titled “The Mentor” and discusses different instruction options about how to improve your underwater photography.
The Mentor

Bought all that fancy new gear but having trouble putting it together? Blinding yourself with the strobe instead of illuminating fish? Its time to seek professional guidance to further your photography habit.
You’ve spent hours on the net scouring websites and chat rooms for ideas and inspiration; you have assembled your new gear time and time again; you have even read the instruction manual from front to back! But does the idea of getting in the water and taking pictures seem like a daunting task? Not to worry, you are not alone! What options do you have to make the idea of plunging into the ocean with your new setup less stress inducing? Fortunately, there is an easy answer to that question. How about spending time with a mentor to guide you along the confusing world of shutter speeds and f-stops?
With a world of workshops and instructors out there, it’s hard to choose where to begin. The first step is addressing where you are in the learning curve and finding a situation that will give you the most benefit. If you are new to photography then winning prizes at a “photo shootout” may be a bit much to hope for. Similarly, shooters with several years of photography experience may find a “beginners” class too basic for their needs.
Here we break down 4 popular options to better understand the “pros and cons” of each in order to invest our time and money wisely.

PADI Underwater Photography Specialty
As the world of digital photography exploded in recent years, PADI didn’t sit on its heels to watch it go by. A brand new Digital Photography course is now available, designed specifically with new photographers in mind. The course follows a simple yet effective mantra of “Shoot, Examine, and Adjust”, a perfect match for the instant feedback available from digital cameras. The thoughtfully designed workbook guides the photographer through basics such as composition, adjusting camera settings, and computer work. Coupled with an experienced photographer/instructor, this course is a great way for the new photographer to get comfortable with their camera. One major benefit of the class is the chance to have a lot of underwater time with an instructor on hand helping to set up shots and guiding you though proper adjustments. As an added bonus, the PADI Digital Photography course can be taken just about anywhere! Most PADI dive centers around the world will have a photo instructor on hand who will be only too happy to help you get started.
What to look for: Choose your instructor well! Ask to meet the instructor ahead of time and offer to show him/her your camera equipment and manuals. A good instructor will want to know all about your camera, offer him/her the opportunity to take the manual home a day or two in advance of the class in order to be well prepared to meet your needs.
On Location Photo Workshops

Not too thrilled with the idea of jumping into your local pool or quarry in the middle of winter to learn photography? No problem! Throughout the year many of the world’s top underwater photographers offer “on location” workshops. Not only will you get the chance to learn from full time photographers, you get to dive in the top destinations in the world! Workshops are a great way to take your photography to the next level as you have the chance to learn from folks who actually do it for a living. Basic and advanced workshops can both be found and cater to the needs of novice and experienced photographers. Basic workshops start from the beginning and explain everything a new photographer needs to know to get them shooting top quality photographs in no time. With a weeklong course, there is plenty of time to absorb the information and put it to good use while churning out a stunning portfolio of images. Advanced workshops are geared to those who have the basics down but want to learn tricks of the trade and further their personal skills. Workshops typically consist of diving in the morning with group lectures in the afternoon and the evening reserved for critiquing sessions and entertaining multi media presentations. You will also enjoy diving and socializing with a group of like-minded individuals who want to discuss photography and learn at the same time. Watching the improvement of your fellow students throughout the week is almost as satisfying as seeing the benefits of “putting theory to use” on your own photos.

What to look for: Research and communication ahead of time is important. Professionals who put the students first conduct the best workshops. They spend their time underwater with you and not with their camera. This means they are giving 100% of their attention to the students and offering guidance underwater, not working on their own portfolio!
Photo Shootouts with Celebrity Judges
One of the more popular events today is the Photo Shootout. These come in several forms: from one-day local events to one-week extravaganzas. Typical shootouts attract a large number of photographers all vying for extravagant prize packages. Although not really a learning event per se, many shootouts host a panel of judges who give informative and helpful discussions during the evening. These professionals are open to give advice on questions of all sorts, from how to get a certain shot at a particular site to the latest Photoshop techniques. Shootouts offer a fun and relaxed environment to meet new people, dive great destinations, and the chance to win camera gear and dive trips!

What to look for: Experienced photographers with all the latest and greatest gear sign up for these events specifically to win the big prizes. If your aim is to improve your photography significantly, the learning opportunities of these events is limited compared to a workshop. However, if you know your camera, you enjoy a good time and meeting new folks, and really want to win some prizes; then these events are for you.

One on One Pro Photography Courses
With their “workplace” as the ocean, many of the world’s best underwater photographers live in amazing seaside locations. Oftentimes, these photographers are available for “one on one” photography courses. What better way to master the art of photography than to spend a few days with a personal mentor!? The advantages of an individual class are many: tailored to meet your needs no matter your experience, no “slow” students to slow down the class, the opportunity to spend as much or as little time on particular subjects as you want…the list goes on and on. Even better, the pro is with you every step of the way watching your composition and offering critiques based on shots he/she watched you take. The learning curve of a “one to one” class is much faster as the instructor does not have to split his/her time among a group of students, its just you! This option may cost more money than others, but if your goal is improving your photography to its utmost, then this is the option for you.

What to look for: Location, location, location. Having an idea of what subjects you want to shoot and where they are located is key. Once you have decided on the area you would like to visit, do some research into who may live there. Odds are, if the area offers superb diving, an experienced professional lives near by. Even if he or she doesn’t market classes to the general public, don’t be shy! Pros are open to helping out those who want to learn and will go out of their way to help you along the way.
Living in the Indo Pacific area is special in many ways, one of which is the abundance of good diving. And with great diving come a lot of top notch local photographers; so get out there and take advantage of one! Workshops, classes, and shootouts are on offer all over the region. Plan your calendar accordingly and sign up for one now, not only will you reach your goal of improving your photography, you may even win a new camera!
About the author: Originally from Vancouver, B.C., Canada, Wetpixel moderator Mike Veitch is a professional underwater photographer and trip leader. After spending many years working on boats and resorts in the Indo-Pacific region, Mike has settled in Indonesia where he spends his time photographing the worlds richest marine bio-system and conducting photography workshops and leading trips throughout the country.
Mike is a frequent contributor and field editor to Scuba Diver Australasia magazine where he wrote the “how to” underwater photography column, “In Focus” from 2006-2009. This series is a collection of his “In Focus” articles that originally appeared in the magazine during that time, the format and photos have been updated for Wetpixel


